
How Can Experts Prevent Bubbles and Wrinkles in Contact Paper Installation?
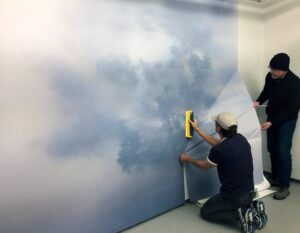
Summary:– Learn how experts prevent bubbles and wrinkles in contact paper installation for smooth, professional results. This guide explains surface preparation, measuring, cutting, and proper application techniques. It covers cleaning surfaces, using tools to remove trapped air, handling corners and edges, aligning patterns, and correcting mistakes. Professionals ensure durable, neat finishes on walls, furniture, and shelves, saving time and stress. With tips from RGT Wallcovering, readers understand how skilled installation transforms any space, making DIY errors avoidable and giving long-lasting, flawless surfaces. Using contact paper is a fast and easy way to make walls, shelves, or furniture look new. But applying it without mistakes can be tricky. A contact paper installation service helps prevent problems like bubbles, wrinkles, and uneven edges, giving your home a smooth, neat, and professional look. Experts know all the tricks to make the surface flat and the paper stick perfectly. Whether you are updating your kitchen, bedroom, or furniture, applying contact paper can save time and create a clean, modern finish. Doing it yourself often leads to mistakes, but professionals make it look effortless. Common Problems with Contact Paper Bubbles and wrinkles happen when surfaces are dusty, oily, or uneven. Even small mistakes in measuring or sticking can cause trouble. Air gets trapped between the paper and the surface, creating bumps that are hard to smooth out. Corners, edges, and curved surfaces are the hardest areas. Professionals check every corner and make adjustments before they even start. They make sure the paper aligns correctly and that no dust or dirt will trap air under it. Sometimes the adhesive side can fold or stick to itself. Experts know how to handle it without tearing the paper, which is why their work looks smooth and flawless. Cleaning Surfaces Before Applying Paper The surface must be clean and smooth for perfect adhesion. Experts wash walls, shelves, or furniture with mild soap and water to remove grease, dirt, and dust. Drying the surface completely is essential. Any leftover moisture can trap air or make the adhesive weak. Professionals may use soft cloths or paper towels to make sure the area is ready for contact paper. Even a small piece of dust can create bumps later. Cleaning carefully prevents problems before they start and saves time fixing errors after the paper is applied. Measuring and Cutting Correctly Correct measurements are key. Wrong measurements can make the paper bunch up, leave gaps, or misalign patterns. Experts measure carefully and cut the paper slightly larger than the surface. This extra margin allows small adjustments for perfect alignment. Cutting at an angle or using sharp tools makes edges cleaner and easier to press down. Professionals often use rulers or straight edges to make precise cuts. This attention to detail prevents wasted paper and ensures a neat finish. How to Apply Paper Step by Step Experts usually apply contact paper in sections instead of all at once. They peel back a small area of the backing and press the paper gently onto the surface. Working slowly pushes air out and keeps the paper smooth. They use slow, overlapping strokes to cover larger areas without creating wrinkles. This method also helps them line up patterns properly. Beginners often try to stick large sheets all at once, which leads to bubbles and uneven edges. For tricky areas like corners or edges, professionals use small tools to press the paper in place while avoiding creases. Working in smaller sections is the key to a professional look. Tools Experts Use to Smooth Paper Special tools help remove bubbles and wrinkles. Soft squeegees, plastic cards, or rollers push air out and make the paper stick evenly. Experts may also use small brushes or cloths to smooth edges without tearing the material. Using the right tools ensures the paper does not stretch or fold, keeping the surface perfectly flat. Even experienced DIYers often miss tiny bubbles that grow over time. Tools make the installation faster and reduce the chances of needing repairs later. Fixing Mistakes Without Ruining the Paper Even with care, tiny bubbles may appear. Professionals know how to lift the paper carefully without tearing it. Small pinpricks release trapped air, and the paper lays flat again. Wrinkles can sometimes form near edges or corners. Experts gently lift and reposition the paper until the surface is smooth. Knowing how to fix mistakes quickly prevents frustration and makes the paper look flawless. If a section of paper is damaged, professionals can replace it neatly without affecting the rest of the surface. This skill ensures the final look is clean and professional. Matching Patterns and Edges Many contact papers have patterns or designs. Experts make sure patterns align across seams and corners. Proper alignment makes the paper look professional and pleasing to the eye. For furniture, cabinets, or walls with multiple surfaces, matching edges is essential. Experts check each piece before pressing it down. This step transforms simple paper into a polished, cohesive look. Without careful matching, patterns can look off-center or uneven, which is noticeable even from a distance. Professionals make the design flow naturally. Dealing with Different Surfaces Some surfaces are tricky. Curved furniture, textured walls, or uneven shelves can make contact paper challenging to apply. Experts adjust techniques for each surface type. For curves, they may cut smaller sections or use heat tools to make the paper bend without wrinkling. On textured walls, they may apply extra pressure or use specialized adhesives. This experience ensures that every surface, no matter how difficult, looks smooth and neat after installation. Final Check and Touch-Ups Before finishing, experts inspect the paper for bubbles, lifted edges, or misaligned patterns. They press down all edges and smooth every surface. Small touch-ups ensure long-lasting adhesion. Professionals often apply extra smoothing on corners or areas prone to lifting. The result is a polished and durable finish that looks professional. Why Professionals Save Time and Stress Trying to apply contact paper yourself can waste time, paper, and patience. Experts save you stress by doing it